Mouldy Bread
Posted:
February 24, 2018
Categories:
Biology
The Mouldy Bread Experiment
Learning Objectives:
- Students will develop and/or refine their skills in designing and conducting experiments.
- Students will understand the factors that promote and prevent the growth of mold on bread.
Equipment required (per student or pair of students):
- 2 slices of bread each cut into halves.
- 4 small ziplock bags
- 4 sticky labels and pen
- Access to water, a fridge and perhaps a toaster (optional)
Some moldy bread in a sealed bag for demonstration purposes.
Procedure:
Show the mouldy bread to the students to prompt a discussion. (You could give it a little backstory, e.g. ‘I wanted to make toast for breakfast this morning, but look what I found when I looked in the cupboard!’)
Talk about how the mould got on the bread, how long it takes to grow, why it grows. Ask whether they think we could stop mould from growing on bread, or the opposite: grow lots of mould on the bread. The discussion should head along the lines of making the bread cold (in the fridge or freezer) to stop mould and to make it damp and keep it in the cupboard to speed up mould production.
Give the students their equipment and ask them to come up with three different things they can do to the bread, or different places they can put the bread to investigate what conditions make mould grow. Ideas might by to put it in the fridge, or freezer, or wet it, toast it to dry it out, store it in a dark cupboard, on a sunny windowsill. You could list the ideas under the heading ‘variables’ (things that affect the outcome of an experiment). Depending on the students, you might like top discuss ‘controlling variables’ by just changing one thing at a time and keeping the rest the time.
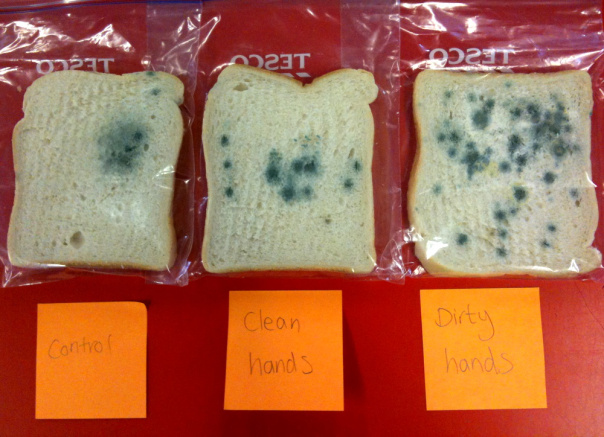
Piece of bread number four is the control. A control is a very important concept when using the scientific method. It is the thing that all other results get compared to – so, bread that is unaltered and stored in a regular cupboard like a pantry.
Have the students draw four pieces on bread in their notebooks and clearly note down what the conditions for each piece will be, then allow them to bag them up(or wet/dry them first), label the bags and store the bags in their different locations.
Check on the bread every day for a week. Have the students draw or photograph changes to the bread. They should then be able to draw a conclusion as to what conditions speed up and slow down the growth of mould on bread.
Recent Posts


Showcased Product
Energy Stick

Completely safe to touch and handle, simply complete the circuit by touching both electrodes at the end of the stick simultaneously.
