Chip Bag Shrinkies
Posted:
July 26, 2017
Categories:
Chemistry
Chip Bag Shrinkies
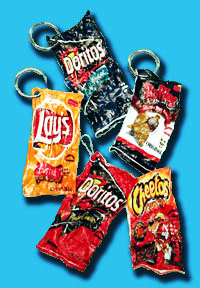
Shrink your chip bags to less than half their size, then use them as a bookmark or keychain. Polymer chemistry fun!
Suitable for kids aged 10+ with parental supervisionCAUTIONThis activity strictly requires supervision by an adult. It involves the use of a hot oven and handling hot plastic. Ensure that the room is well ventilated, so all fumes given off by the heated plastic chip bag dissipate as quickly as possible.
You Need:
- Empty bag of chips (plastic outside, aluminium inside)
- Baking tray x 2 (or oven proof plates)
- Sheets of baking paper x 2 (bigger than the chip bag)
- Towel
- Oven mitts
- Oven
What to do:
- Preheat your oven to 100 degrees Celsius or 200 degrees Fahrenheit.
- Wash your empty chip bag gently with water and dry with a towel. Crumbs make bumps in the shrinkie, so you really want to start with a clean bag.
- On a baking tray, lay your chip bag flat between two sheets of baking paper. To get a long, flat shrinkie place an oven proof plate or tray on top. If you are after a more scrunched look, do not place the plate/tray weight on top.
- Place the baking trays in the oven for about 10 minutes. Have an adult check it every 2 minutes.
- Have an adult take the tray out of the oven and let it cool. Slowly peel the baking paper apart to reveal your new chip bag shrinkie.
Why is it so?
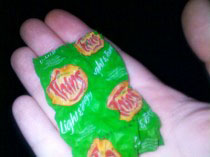
The shiny chip bags are made with a piece of aluminium foil sandwiched between two plastic films - the aluminium prevents air entering the packet and keeps the chips fresher for longer. The plastic in the chip packet is made up of long polymer molecules that have been stretched so they are almost straight. When the plastic is heated in the oven, the molecules that make up the plastic are energized so they start to vibrate faster, wriggle and writhe. The molecules end up wiggly, making the plastic film thicker and shorter. And thus your chip packet shrinkie. Have an adult drill a hole in the corner to make it into a funky key chain.
Recent Posts


Showcased Product
Energy Stick

Completely safe to touch and handle, simply complete the circuit by touching both electrodes at the end of the stick simultaneously.
